Thursday, February 24, 2011

I love the Dollar Stores

Recently my mother and I were passing a shopfront that said, "Coming Soon: Dollar Tree." She sighed and said, "Yes, because what we need is another dollar store." I laughed inside myself, because I LOVE DOLLAR STORES!! I have found the greatest things for, yes, a buck. Some things you can get at a better deal other places, not gonna lie, but I love knowing that if I am in a pinch and need a vinyl table cover in black, it's just waiting for my little George Washington. I am hooked on their puzzles, too--500 piece puzzles for a BUCK. Nice. And it doesn't matter if Bitty Girl pulls it apart while I am in the bathroom and loses 5 pieces, because it was...all together now...A BUCK. And then I can donate the pieces to the Kindergarten class for crafts.

Last night Little Girl, Bitty Girl and I were shopping while the boys and Daddy were watching The Jimmer in the Marriott Center (another post for another day--go Cougars!!), and we found these repositionable stickers. We bought them and promptly came home and decorated a space in the girls' room next to the closet.


How cute is that?! We had previously embellished the other wall with these butterflies when making the flower fairy garland that hangs over their beds.


Little Girl liked leaving the ribbons hanging down, so we didn't trim them. Bitty Girl loves to look at this as she goes to sleep. We run a fan when she sleeps as a noise blocker, and it makes the fairies sway, sort of like a mobile.

So I have decided to put as many dollar store crafts on here as possible. Anyone who knows me (or my husband) knows that I LOVE deals. It makes finding the perfect thing just that much better, knowing you got it at a deal. So, Mom, sorry to disappoint, but I will probably hit that dollar store someday, and who knows? I might even find something for your house.

Saturday, February 12, 2011

Valentine Relay

For my 5th Grader's Valentine's Day class party, I decided to do a relay race. The class will be divided into three groups and will rotate stations; at mine, we will divide into two teams. They will have to line up behind a line, race down to the other end of the "course," and pick a card from the bowl there. The cards will have instructions dictating their return to the line: Walk like a crab, Swagger, Hollywood wave, etc. The first team to make it through all of the cards wins...the right to Share the LOVE!! (They will give the other team each a chocolate candy heart and then eat their own.) I hope it will be fun! I will post the cards I make as soon as I figure out how to do that. Help, anyone? :)

Friday, February 11, 2011

Bee Mine Valentine Cookies


Ok, so last year when I saw Oreo's Spring yellow cream cookies, I immediately thought: BEES. This year when they reappeared, I refined my idea and this is what I have come up with--the Bee Mine Valentine. Totally sweet.


Here's what I did:


Remove one chocolate wafer from 3 Oreo cookies and discard (eat them). Unwrap a small Reese's PB cup and a Hershey's Kiss. Holding them over a heat source, melt the bottom of a Kiss and use it to "glue" the three Oreos together. (You will smear chocolate onto two of the yellow cremes and top each one with another cookie, ending with 3 cookies joined together. The Kiss is no longer usable, and you must eat it.) Melt another Kiss, or use the same one, if it isn't too deformed, and attach it to the remaining yellow creme. Warm the ends of your licorice pieces and roll the ends down to make antennae. This took a little doing to make them stick together, not gonna lie. Press them into a PB cup, making "pilot holes" with a toothpick as needed. Finally, melt the top side of the PB cup and stick it onto the chocolate cookie on the other end for a head. Stinking. Cute.


Gourmet Mom on the Go's Royal icing eyeballs would be perfect for this. I will have to make some.

I think it would be totally cute to make a beehive out of glazed doughnuts in graduated sizes, pin a "Bee Mine" sign from the top with a toothpick, and have the bees buzzing around the hive. Cute.

PS. Did you know that they sell PB Minis, Rolos AND Kisses together. Much better to have one bag of candy than 3...

Wednesday, February 9, 2011

Closet Door Makeover

I love to decorate, though I am in NO WAY an expert. I am "good" for my own tastes, I guess. :) A year ago we moved into this house, and I have to say I think it is fabulous! I love it--it's a 1960's-ish rambler with lots of room. I love to have families over to socialize, especially because there is plenty of space for the kids to go downstairs and play, loudly, if they wish, and the adults can still sit and visit in relative peace.

Anyway, one of the things that I thought I would like to change is this closet in the girls' room:

It's just a little too brown. Their room is decorated in pinks and light greens, so this didn't really fit. One thing I have learned about myself is that I am NOT a painter. To simply paint these doors white is actually not a solution for me. They would turn into a gloppy, sticky mess that would peel in spots and look AWFUL. So, brown they stayed. Until one day, as I was organizing linen closets, etc and lining shelves with Contact paper, a light appeared and I heard the angel choir. Hello! Why not put the Contact Paper on the doors? I quickly listed the pros and cons: Easy, removable, inexpensive, fits the color scheme--I couldn't see a down side. So, up it went!

I removed the door knobs and didn't even measure, really; I held it up to the top of each panel and let it unroll to the bottom, then creased it against the carpet with my toes. Not very scientific or professional, but, hey, that's how I roll. Once I had a mark, it was simple to follow the printed grid on the back and cut my piece. I started by peeling off the backing on the first 2 inches at the top and sticking it to the door, and then alternated smoothing/pressing the liner onto the door and peeling about 5 inches at a time. Press, peel. Press, peel. After it was all done, I wrapped the excesses around the sides, trimming out the hinge areas. It worked pretty well. Here is the finished product:


Um, I guess you should imagine the other doorknob on and the scissors back in the knife block. Heh heh. But I think it turned out pretty well, all things considered. I thought about going to Hobby Lobby and getting fancy little girl knobs, but I think these will be fine.

Tuesday, February 8, 2011

Service-a-Day Project

My post for today is about helping those around us. Today I got to spend time with my wonderful mother. She is a very giving, caring person, who will NEVER ask for anything. She is also a Certified Public Accountant, and, more to the point, my accountant. In lieu of faxing our tax info to her, I decided to drive it down (it's about an hour away) and say hello. I am so glad I did! I found her in need of a personal assistant for the day, and was happy to oblige.

With that introduction, I want to tell you about a new thing I've been doing. I have a goal to consciously perform one act of service every day. So far, I have visited neighbors who are alone, made lots of dinners, placed phone calls, and spent extra time with family members who need it. I have to say, it has been very rewarding. I keep a brief summary of every day's activity in a planner, just to keep myself accountable. It has helped me with my goal to be calmer.

Anyway, if anyone wants to take the challenge, I hope you will post some of your experiences. I would love to hear them!

Monday, February 7, 2011

Flower Fairies


This is a really fun project to do with little girls anytime, but what could be cuter than a fairy valentine? I can just see this handed out with "You are a 'fairy' good friend," or "You make my heart flutter" attached on card stock. (Insert sing-song voice here...) Adorable!!

Materials needed:
Silk flowers (the kind that have petals that can pulled off of the stems)
Jewel Beads (I got mine from Michael's)
Ribbon
Pipe Cleaners (optional)


Tool list:
Needle big enough to thread the ribbon through but small enough to fit through your beads
Scissors

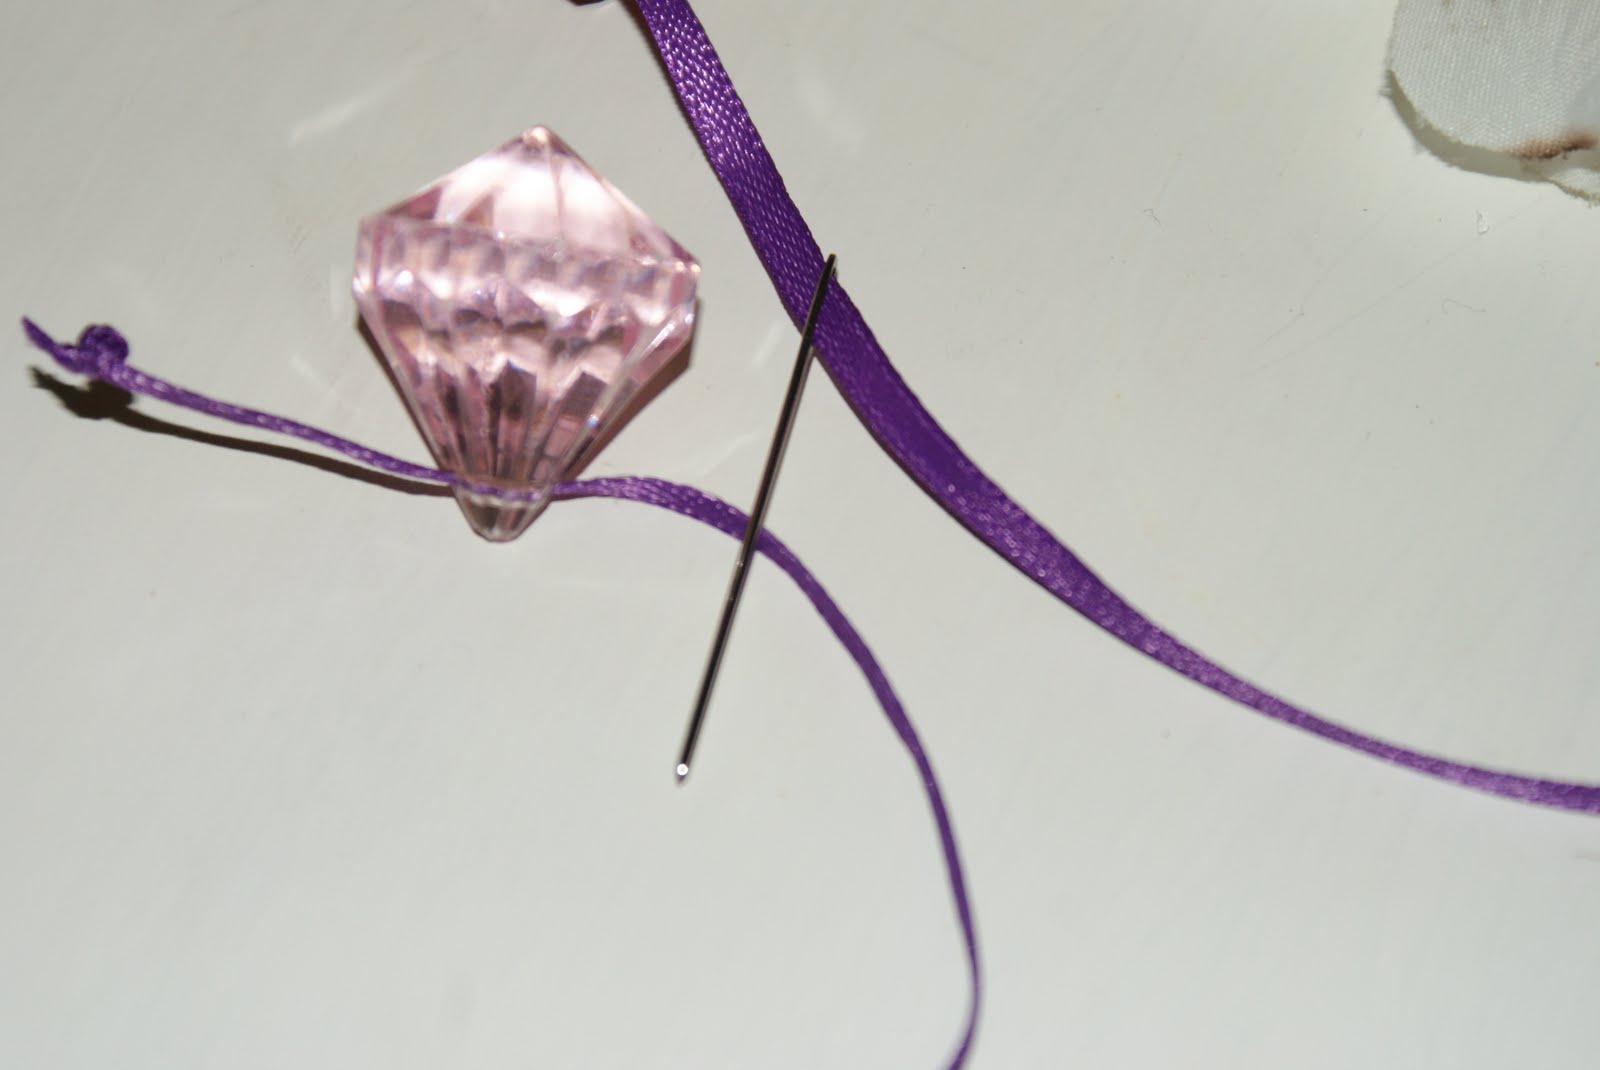
String a bead onto the bottom of your length of ribbon and tie a knot. I ended up hanging mine on a garland in the girls' room, and I used varying lengths, but about 18 inches will be an average length. **If you are wanting to add pipe cleaner legs, cut a pipe cleaner in half, bend in the middle, and roll the ends 1-2 times to form feet. Then you will need to loop the ribbon down through the bead, around your legs, thread it back up through your bead, and tie the end off ABOVE the bead. Not as tricky as it sounds...

Remove the flower petals from the stems and layer them on over your bead, facing down, with the smallest petals on top of the larger ones (so you can see all of them when they are stacked).
Now add a smaller bead for a torso, and add another petal or two on top for a bodice.

Add a head bead and tie another knot at the top to keep it all together. Cover the knot with any petals/sepals you want to make into a hat or hair or whatever.

Some of the fairies we added wings to, but others we just left as is. To make wings, take a pipe cleaner and bend it in half around your ribbon just below the torso bead, or above it but under the bodice flower petals. Twist it once or twice to keep it attached, then bend each end into a loop and secure (by twisting). Bend the wings 90 degrees. About three quarters down on the outside loop, gently press in, making an "upper" and "lower" wing distinction. Repeat on the other side.

You will use this same technique to add arms, using only 1/2 of a pipe cleaner twisted around the ribbon, rolling the ends once or twice to form hands.

We have also made fairies using pipe cleaners in lieu of the ribbon, so the could sit up instead of hang. If you do this, I recommend omitting the bottom jewel so she will sit a little more easily. This variation also lends itself to adding embroidery floss hair, if you wanted; just wrap the top end of the pipe cleaner around a small skein of floss and push the sharp end back down into the bead. Twist it once, also, for good measure. Trim the loops of the floss and glue a rhinestone to the top of the pipe cleaner for looks.

Voila! Gorgeous! And cheap, too! One bunch of flowers can make many fairies! I like to buy bags of assorted blossoms from the local thrift shop, because then you have a variety of sizes and colors to mix and match hats, bodices, dresses, etc. Just today I got a large bag of flowers for $2. You can often find the small ribbon spools on sale for 3 or 4 for $1 at Michael's or JoAnn's, and the bead packages run about $3 for around 25 big beads and $3 for 50 smaller "torso" beads. So not a bad deal, all together. About $.50 a piece, maybe. Better than other party favors, and they love playing games with them afterward.

Sunday, February 6, 2011

Super Bowl Sunday

Like many families across America, our family's male population will be rushing home from church to plant themselves in front of the Big Game, not to be heard from again until there is a champion team. Well, first they will want their grub. THEN they will be in a football induced stupor, roused only by stellar athleticism and empty plates. In honor of this event, our family will be hosting our Pattee cousins and snarfing down some 7-Layer Dip and Hot Wings. I like the Dip because it is served at room temperature anyway, so it can be neglected and no one will care. :)

7-Layer Dip
2 cans Refried Beans
2 cups Cheddar Cheese
1/2 pint Sour Cream
Guacamole (I usually use 4-6 Avocados)
Diced Tomatoes
Olives
Green Onions
Chips

In a 9 x 13 pan, spread refried beans and cover with cheese. Place pan in oven (350 degrees) to melt the cheese. When it is melted to your liking, take it out and spread guacamole over the top, then the sour cream, and top with tomatoes, olives and onions. Serve with tortilla chips and let the party begin!

The wings I bought from Costco today, along with some Blue Cheese dressing. Fabulously easy!

My 9 year old is a Steeler Fan, but I am not really, so I have to say, GO PACKERS!!

Saturday, February 5, 2011

Hawaiian Haystacks

In a crock pot, combine:
1 8 oz pkg cream cheese
1 pint sour cream
2 cans cream of chicken soup

Add 5-6 chicken breasts, trimmed and cut up into about 3 pieces per breast. Cook on low for 7-8 hours. Shred chicken pieces and return to sauce. Serve over rice and add toppings. YUM!!

**I like to use low fat sour cream, reduced fat cream of chicken soup, and Neufchatel for this recipe, because you really can't tell the difference, and anytime you can eat low(er) fat and not notice, I am all for it!

Suggested toppings:
Chow Mien Noodles
Diced pineapple
Diced bell pepper
Slivered almonds
Chopped celery
Cheddar cheese

Friday, February 4, 2011

Holiday Eats

So one of my goals this year is to have more fun with my kids. So I started by making all of the remembrance days official celebrations in our house. Martin Luther King, Jr Day saw us eating pork chops and mashed potatoes (my version of Southern fare) and discussing civil rights. It was interesting to see what the kids knew, thought they knew, and what was new information. It was a good discussion.


We also celebrated Groundhog Day with mashed potatoes (I didn't recognize this trend before...). I served meatball "groundhogs" sitting atop a mashed potato mound, decorated with a shaped butter flower.

Huh. I guess when one is hoping for molded meat end products one should make sure one uses very lean meat, so the sculpture doesn't shrivel into unrecognizable blobs. Oh well. Hopefully my garnishing skills will improve with practice...


For dessert, we ate the shadows that Puxatawney Phil missed. No one criticized this food choice, I tell you what!

We sort of missed Chinese New Year, which makes me sad because I love Chinese food, but then I remembered 1) Eating out is not in the budget and 2) I don't know how to make Chinese food, except for wontons and possibly egg rolls. So we are going to have our festivities tomorrow, with Hawaiian Haystacks that are topped with chow mien noodles. Hey, the decorations will be cool...maybe...yay, Year of the Rabbit!!